


With the COVID-19 pandemic, many organization are completely suspending or reducing the number of volunteer opportunities. There are several ways to handle this in your Volgistics account. This blog post explains more about each of your options.
Disable Self-Scheduling and Related Updates
Disable Self-Scheduling. If your volunteers self-schedule through the VicNet portal or VicTouch sign-in stations, you can simply disable self-scheduling so volunteers cannot make new schedule entries. Volunteer schedules will still show for the time you’re closed, but this will not impact volunteer hours served because these are recorded separately. To disable self-scheduling:
- Select Setup from the menu.
- Go to VicNet or VicTouch.
- Select Self scheduling.
- Un-check the box in front of “Allow volunteers to self-schedule.”
- Click the Save button at the bottom of the page.
Inform Volunteers. You may also want to add information about the changes to the VicNet or VicTouch login pages to inform volunteers of the changes. To do this for VicNet:
- Select Setup from the menu.
- Go to VicNet.
- Select Ground rules.
- Update the information in the Login Instructions field.
- Click the Save button.
To update VicTouch:
- Select Setup from the menu.
- Go to VicTouch.
- Select Check-in sequence.
- Select PIN screen setup.
- Update the Greeting or PIN keypad instructions.
- Click the Save button.
You may need to shut down each VicTouch station and then restart to make the change show.
Disable Automatic Schedule Reminders. Volgistics can be set up to automatically send reminders to volunteers about when they are scheduled. To avoid confusion, you should disable these during the time volunteers will not be serving. To do this:
- Select Setup from the menu.
- Go to Scheduling.
- Select one of the reminder types.
- Un-check the box at the top by “Send reminders.”
- Click the Save button.
Repeat these steps for each type of reminder so you’re sure none will be sent.
Add Holidays
Another option if you do not want to actually remove the schedule for regularly scheduled volunteers is to add holidays for each date you will be closed. Adding holidays will remove the volunteers who are scheduled on a regular or repeating basis from the schedule, and also close all unfilled openings that repeat. Volunteers scheduled for only one day, and one-day only openings, are not removed by holidays so this is a good option if you will still have some positions open for volunteer service. To add holidays:
- Select Setup from the menu.
- Go to Scheduling.
- Select Holidays.
- Find the “Add” box at the bottom of the page and enter a date you’ll be closed and some text such as “COVID-19 Closure.”
- Click the Save button.
- Repeat steps 4 & 5 for each date you’ll be closed.
Block Self-Scheduling in Select Assignments
If you only want to prevent volunteers from self-scheduling in certain assignments, you can update the assignment’s Rules tab. If you also want to remove the volunteers already scheduled in the assignment, you will need to follow the additional steps in the “Remove Scheduled Volunteers” section below. Here is how to update the Rules tab:
- Select Assignments from the menu.
- Go to an assignment where you want to block self-scheduling.
- Select the Rules tab.
- Under “Who can sign-up for this schedule?” select Volunteers cannot schedule themselves or be scheduled by coordinators.
- Click the Save button.
- Repeat steps 1 – 5 for any other assignments where you want to block self-scheduling.
Remove Volunteers Scheduled
If you want to remove all the volunteers who are scheduled for a certain date you’re closed, you will need to do this on an assignment-by-assignment basis. Here are the steps to follow:
- Select Assignments from the menu.
- Go to an assignment where you want to remove volunteers from the schedule.
- Select the Schedule tab.
- Go to the daily view for a date you want to remove the volunteers from.
- Click the Remove all link at the bottom right below the schedule entries. When the confirmation pop-up appears, click the OK button to verify you’d like to remove the scheduled volunteers.
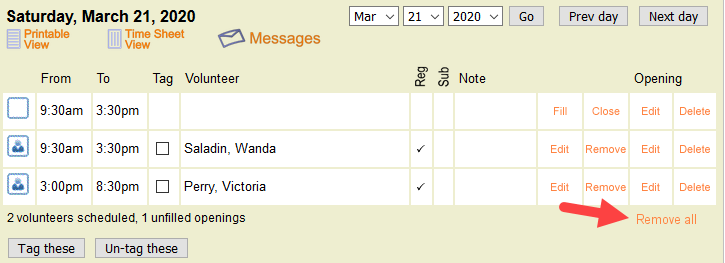
You will need to repeat these steps for each assignment and date where you want to remove the scheduled volunteers.
Contact Support
If you have questions about which of these options to use, please don’t hesitate to reach out to the Volgistics Support Team. Just explain what your organization’s plans are in response to the pandemic and we’ll be happy to give guidance on the best solution.